
APPENDIX – Rodent and Pest Bird Management
Rodent and Pest Bird Management
Sanitation
Sanitation involves the proper handling and storage of food supplies and wastes as well as the elimination of areas attractive to pest wildlife. Poisoning can temporarily reduce a rodent population. Permanent reduction is rarely possible and completely impossible unless food and shelter are removed. Pay close attention to each of the following:
- Garbage: Garbage is an excellent source of food and water. Store garbage in containers with tight-fitting lids that are secured onto the container.
- Feed and Grain: Around the farm, feed and grain are probably the main food sources for rodents. Clean up any spilled feed and grain and avoid leaving sacks of these items where rodents can gnaw into them.
- Harborage: Trim weeds and brush, remove trash, and keep any supplies on racks that are at least 18 inches off the ground and away from walls.
- Water: Do not give rodents access to water. Repair leaks, drain standing water, and cover open water supplies.
Rodent Proofing
Rodent proofing involves making structural changes in a building to prevent entry by rats and mice. While this would seem the most effective and permanent method to reduce rodent damage, it has many weaknesses. Due to human error, rodents may not be kept out permanently; doors and windows may be left open, rodent proofing may be damaged after it has been installed, or rodents may be reintroduced by bringing supplies into the area.
The basic principles in getting the most benefits from rodent proofing are:
- An understanding of rodent ability and psychology,
- A thorough inspection of the premises to locate all potential avenues of entry,
- The use of rodent‑resistant materials to close those entries,
- A knowledge of properly designed rodent‑proofing structures, and
- A continuing inspection program coupled with prompt maintenance to keep the building free of rodents.
As mentioned in an earlier chapter, rats can enter openings larger than ½ of an inch while mice can penetrate openings over ¼ of an inch. Any place a young animal can squeeze its skull through, the rest of the body can generally follow.
The location of openings is equally important. Blocking entrances that animals have no opportunity or incentive to use is unnecessary. Where Norway rats are the sole problem, all openings 36 inches above and below grade level should be blocked. However, “grade level” means not only the height above ground line but also above any object the animals can easily climb on to reach an opening theoretically out of reach from the ground. Norway rats have been known to get into upper stories where vines, fire escapes, and other “ladders” are available.
The next consideration is the use of rodent‑resistant materials. Hardness of material is not the only consideration. The shape and position of the material also is important in determining if a material will be rodent-proof. Rodents cannot work on smooth surfaces, seeking instead a “gnawing edge” such as a joint, butt, small hole, or other irregularity where they can get a better bite.
Inspection
Rats may continue to try to break through new rodent proofing during the first two weeks following its installation. It is necessary to keep close watch during this period. It also will be necessary to completely eliminate rodents trapped inside by the proofing. Frequent inspections and prompt repair of any breaks must be considered a part of the overall rodent program.
Rodent-Proofing Materials
| Sheet Metal | 26-gauge or heavier, galvanized |
| Perforated Metal | 24-gauge or heavier of rust-resistant materials with openings no larger than ¼ of an inch |
| Hardware Cloth | 19-gauge or heavier with rust-resistant coating and openings no larger than ½ of an inch of rats and 24-gauge with ¼ of an inch for mice |
| Brick | 19-gauge or heavier with rust-resistant coating and openings no larger than ½ of an inch of rats and 24-gauge with ¼ of an inch for mice |
| Cement Mortar | Should be 1:3 mixture or richer. |
| Concrete | Should be 1:2:4 mixture or richer and 4 inches thick |
Rodent Trapping
Trapping has been and should remain a tool for you to use in solving rodent problems. Traps can remove an animal from a building without any potential odor problem. Traps also can be used where toxicants should be avoided for safety concerns: food-and feed-handling areas, areas accessible to small children, and where birds or wildlife may eat poisoned rats. Traps are the best answer to remove pests as humanely as possible without any environmental pollution by chemicals.
Types of Traps
There are four basic kinds of traps for rodents: snap traps, multi-catch traps, single catch live traps, and sticky traps (e.g., glue boards).
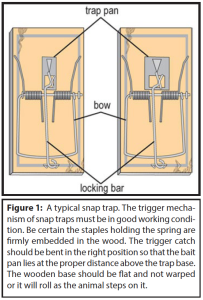
Snap Traps
Snap traps include the typical traps that have been in use for a long time (Figure 1). Snap traps should not be set where pets or children could contact them.
Multi-catch Traps
Multi-catch automatic traps are made for catching mice. These traps can catch large numbers of mice at one time (up to 15). They need no bait or toxic substance and are a good choice for food or feed facilities.
Live Traps
Live traps catch rodents alive. This allows the option of releasing the animal alive, as may be done for squirrels.
Sticky Traps
Sticky traps are more effective on mice than large rats. The sticky material is spread on heavy surfaces such as kraft paper, cardboard, roofing paper, and boards. You can also buy glue boards ready for use. Lengths of it are placed in runways. When an animal steps on the glue, it is unable to remove its foot. Glue boards are used under most of the same situations as traps and are sometimes effective where neophobia has developed. Glues are nontoxic, inexpensive, and hold the animals for disposal the same as traps.
Operation of Traps
When using live traps, check the trigger several times to achieve a sensitive balance. A trap serves little value if the weight of target animals does not trip the release, or it is set so sensitive it trips when a large beetle climbs on the bait.
Trap Placement
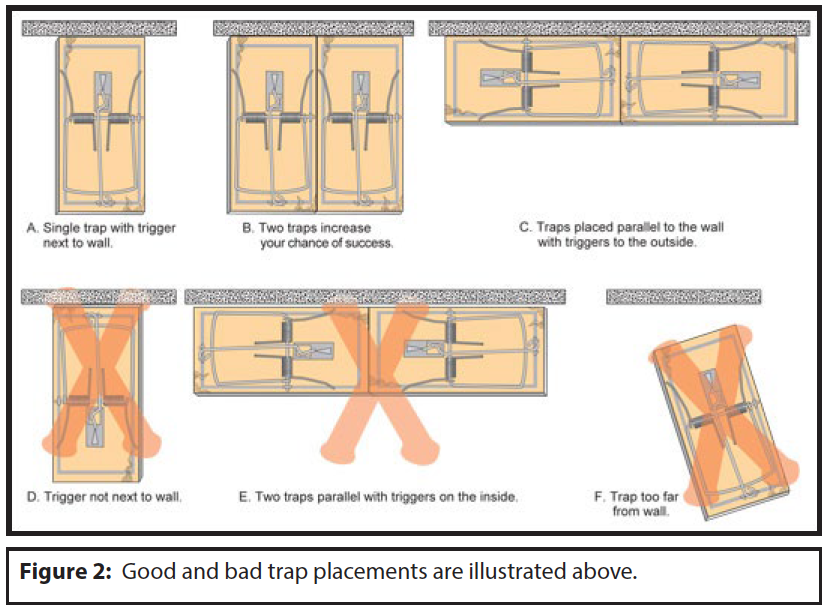
Next to having a trap that will function properly, the most important consideration is the proper placement of the trap. Do not rely on any lure to bring the animal to the trap. Put the trap in a place where the animal will literally stumble over it in the normal course of daily activities. Put traps in dark corners, behind and under objects, where tracks and droppings are numerous, and in normal travel lanes going from cover to food and water. When placed next to walls, the trigger end of the trap should be perpendicular to and against the wall. Force the animals to pass over the trigger by putting boxes or boards to form barriers that will guide them to where you want them to
cross (Figure 2).
Traps should be placed in groups or areas so they can be easily accounted for. Use many rather than a few traps. Possibly a dozen would be the minimum number to use in a private dwelling while 50 to 100 is not excessive for a warehouse or other commercial installation. Traps should not be spaced more than 10 feet apart for mice—three feet is preferred due to their limited range in certain environments. For rats, a minimum of 20 feet should be observed.
Trap Baits
Fresh baits are better than spoiled or rotten foods. Grain (corn, oats, wheat, or barley) mixed with 5% powdered sugar and 3 – 10% vegetable oil is a good rat bait. Peanut butter or a peanut butter/oats mixture is a good mouse bait. Alternatively, pre-mixed, commercial rodent baits are available and effective. The recommendation to bait traps and leave them un-set for three or more days to accustom the animals to this new source of food usually is not necessary for mice but is necessary for rats.
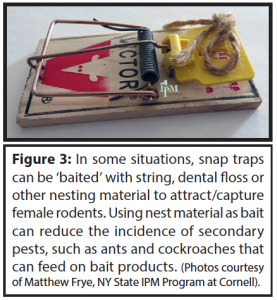
Runway traps do not normally need to be baited. However, studies have shown improved success when baits are used for any trap set. Peanut butter smeared in the center of the bait pan or cereal sprinkled over the surface are good attractants. Bait with attractive foods when there is considerable competition from available food sources. It is not always necessary to use food materials (Figure 3).
Trapping Schedules
It is better to trap a small area intensively than under-trap a larger one. The latter increases the danger of educating a population into trap shyness as other individuals are caught. It also is better to trap intensively for 2 to 3 weeks and then suspend trapping completely. If they can be spared, traps should be unsprung and left in place. One reason for this is that young rodents being weaned seldom migrate from their nest far enough to reach your traps. Postponing a trapping program for a couple of weeks will allow these rodents to grow big enough to find your traps at which time trapping can resume.
Check traps every day to remove dead rodents. If possible, bait and check trap lines in the late afternoon. Records of your catch will enable you to pick out unproductive locations. Don’t constantly move traps because it takes a while for animals to approach them. After seven days you can move unproductive to more fertile hunting grounds.
Pest Birds
You should review the legal responsibilities surrounding bird control before attempting any control technique. These were outlined in Chapter 5, “Pest Birds.”
Tools and Methods
Remember that we outlined pesticide use for the control of birds in Chapter 5 and in the chapter, “Pesticides.” Here we give details of other techniques you can use in place of or along with chemical control. Habitat Modification.
Birds can become a problem when food, water, shelter, or nesting sites are readily available. Habitat modification to limit these requirements can be an important technique for pest bird management. As with all techniques, habitat modification is most effective when coordinated with other measures in an integrated management approach. Be careful, however, to fully understand how habitat modifications may affect non-target wildlife also relying on the habitat to be modified.
Limiting Food
If birds are attracted by a supply of food, removing the food should reduce the number of birds. However, in some situations, limiting the food supply can be difficult or impractical. In such a case, the feeding areas might be used as baiting sites. Remember that eliminating food will not affect pest birds if they are simply nesting, roosting, or loafing in the area.
Limiting Water
If birds are attracted by a water source, removing the water also should result in fewer birds. Leaks, blocked drainage ditches, and standing water on roof tops or in open containers can often be easily eliminated. However, in many cases the water source is difficult to remove. Major drainage problems are expensive to solve, and often the supply of water is from culverts, ponds, or streams where elimination is impossible. Limiting Shelter, Nesting, and Loafing Sites Restricting favorable shelter, nesting, and loafing sites should discourage pest birds. We will discuss vegetation cover and nest destruction here. We will discuss later excluding birds that are using sites in buildings and other structures.
Limiting Shelter
Crows, starlings, blackbirds, grackles, cowbirds, and sparrows roost in dense, brushy trees for protection from weather and predators. Pruning a portion of the tree canopy in favored roosting trees will force the birds to seek other sites. Consult with an arborist or other tree specialist before removing more than 10% of the tree canopy. Sometimes, in large blackbird and starling roosts, it may be necessary to remove entire trees. Do not remove any trees without approval from the proper authorities and/or the owners of the property. Pruning dense bushes used for foundation plantings and hedges can decrease their acceptance by house sparrows as roosting sites. You may need to remove these plants entirely. Ornamental vines are ideal sparrow roost or nest sites. A major drawback to pruning or removing vegetation is that birds will simply move to another site.
Nesting Disturbance
Populations of pigeons and sparrows can sometimes be reduced by persistently destroying nests and eggs. The simplest form of nest destruction is removal of the nests. Remember, however, that in some localities, nesting birds may not be disturbed, or nests with eggs cannot be destroyed. Check local and state regulations. The nests and eggs of protected species (e.g., bluejays, robins) enjoy the same legal protection as the adult birds.
Nests must be destroyed every two weeks during the spring and summer months. The application of chemical, mechanical, or electrical repellents may prevent rebuilding of the nests.
Exclusion
The design and condition of buildings and other structures is often responsible for large populations of pigeons, starlings, and house sparrows. Building modifications, repairs, or additions to eliminate favorable nesting, roosting, or loafing sites can be an important facet of many bird management programs.
Physical Barriers
Replace broken windows, fill cracks and crevices, and block openings to steeples, vents, towers, and similar areas. Materials used for blocking include wood, glass, masonry, metal, or wire nets and screens with openings not greater than ½ inch. Remember that sparrows and starlings can fit through small openings. Use strong Pest Bird materials to prevent the birds, especially starlings, from breaking through the barrier.
Netting
Netting can deter the roosting or nesting of birds on building ledges, balconies, ornaments, or signs. Tears in the netting will allow birds to enter and become trapped. Lightweight nets also have the potential of entangling, injuring, or killing birds (including nontarget birds) rather than simply excluding them. Another problem with netting is that it is easily damaged by freezing rain and wind. During ice storms, these nets can become a hazard when they accumulate significant loads of ice.
Monofilament Fishing Line
Fishing line can be strung a few inches above ledges, ridges, and other surfaces favored by roosting birds, denying them free or comfortable roosting sites. The line is scarcely visible and is aesthetically acceptable in public places where other devices might be objectionable.
Repellents
Repellents are important tools in excluding birds from buildings and other structures. They fall into three basic categories:
- Physical,
- Electrical, and
- Chemical.
Physical Repellents
Physical repellents are generally used to keep pigeons, starlings, and sparrows from nesting or roosting on building ledges, window sills, ornamental signs, ridges, and roof gutters. In areas where ledges are not more than a few inches wide, light metal such as sheet aluminum or plywood can be installed at a 45° angle to prevent the birds from landing. This gives permanent protection to the ledge.
Electrical Repellers
Electrical repellers give the pest bird a nonlethal shock and are not dangerous to humans. Electrical repellers are expensive and require regular inspection and maintenance.
Chemical Repellents
Sticky repellents are nontoxic pastes and gels that discourage birds, particularly pigeons and starlings, from roosting, nesting, or loafing on treated surfaces. Because house sparrows can cling to very small surfaces, these repellents are usually less effective for this species. Sticky repellents have a limited life span, depending on weathering. If properly applied and used in conjunction with other techniques in an integrated bird management program, sticky repellents can provide effective control.
Dispersal
Visual and sound devices can be used to disperse birds. However, success may depend on the species of bird and what it is doing in the area. Also, as no actual harm comes to the birds, they will lose their fear of the devices over time. This means dispersal techniques only provide short-term control.
Dispersal devices include visual devices, such as scarecrows, artificial hawks and owls or other natural enemies or twirling objects such as strips of shiny metal, mirror shards or colored cloth. Sound devices include automatic gas exploders, firearms, recorded distress or alarm calls and the Av-Alarm.
Shooting
Shooting can eliminate small flocks of pest birds from limited areas. Some cities undertake programs of shooting, primarily at starling and blackbird roosting sites, as a supplement to other harassment procedures. To be successful, a shooting program must be persistent. Shooting programs rarely succeed by themselves in limiting bird populations because new birds will usually move in to replace those eliminated and shooting can be expensive and results in negative public relations. However, shooting can be successfully integrated into management programs when used to reinforce dispersal techniques such as pyrotechnics or distress calls. Sometimes, shooting can be useful in eliminating the last few birds after a successful chemical treatment or trapping program. Before discharging a firearm, ensure it is safe and legal to do so.
Trapping
Trapping can be practical for large numbers of birds, and in areas where food and water availability can be controlled. A large, effective trapping program requires many hours in prebaiting and setting and checking traps.